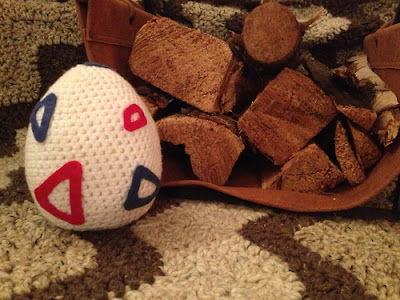
Abbreviations- ch (chain), sc
(single crochet), st (stitch), sts (stitches), sl-st (slip stitch), sc dec
(single crochet decrease), F/O (finish off)
Crochet Hook Size- G
Finished Measurements with using G hook- Approximately 7" tall and 17" in circumference at widest
part. Make sure that you don't make the stitches too tight, or else the egg won't be very plushy.
Materials needed
-Red Heart Super Saver White
-Place Marker
-Red and Blue basic felt
-Scissors
-Yarn needle
-Sewing needle and thread for
sewing the egg spots on. (Recommended, red and blue sewing thread to match felt
colors)
With color White use the adjustable ring/circle method to work
in the round and single crochet 12 stitches into the ring/circle. Place marker
at the top of the last sc, then, start with round one. Remove marker once you
get to the last stitch, and then replace it after the last sc of each round to
keep your place.
R1: *sc in next st, 2 sc in next
st… rep from * (18)
R2 and every even row: sc all
R3: *sc in next 2 sts, 2 sc in next st… rep from * (24)
R5: *sc in next 3 sts, 2 sc in next st… rep from * (30)
R7: *sc in next 4 sts, 2 sc in next st… rep from * (36)
R9: *sc in next 5 sts, 2 sc in next st… rep from * (42)
R11: *sc in next 6 sts, 2 sc in next st… rep from * (48)
R12-22: sc all (48)
R24: *sc in next 5 sts, sc dec in next 2 sts… rep from * (36)
R25: *sc in next 4 sts, sc dec in next 2 sts… rep from * (30)
R26: *sc in next 3 sts, sc dec in next 2 sts… rep from * (24)
R27: *sc in next 2 sts, sc dec in next 2 sts… rep from * (18)
R28: *sc in next st, sc dec in next 2 sts… rep from * (12)
Stuff the egg here. It’ll be a little lumpy at first, but it’ll smooth
out after stuffing it full.
R29: *sc dec in next 2 sts… rep from * (6)
Stuff the project a tiny more if needed then F/O
Cut yarn and leave a tail. Weave tail through remaining stitches twice
and pull the hole close and weave the yarn tail into the egg to hide it.
Pull the yarn tail at the beginning
of the egg to tighten the top and weave it into the egg to hide it. Also, use a
crochet hook to pull the little loop created by the adjustable ring/circle
method into the egg to hide it
Now the last steps are for
creating the egg spots out of felt
Step 1: Cut out 4-5 red and
4-5 blue felt pieces in the shape of triangles or rhombuses at different sizes
(whatever shapes you want really). Make sure the corners are a bit rounded for
the Togepi Spots. Cut out the middle of the felt pieces as in the picture. You can always look up
Togepi’s egg online to see pictures of the egg spots too.
Step 2: Now, sew red spots in
the appropriate places with the red thread and needle, and the blue spots in
their appropriate places as well with the blue thread and needle.
[A tip for great spots is to not pull too tightly on the
sewing thread while sewing. Otherwise the spots will come out wavy after
sewing]
You’re finished! J


No comments:
Post a Comment